Hearing aid insertion and volume adjustment for optimal comfort and performance
Hearing aids help you rediscover the sounds you love and reconnect with the world around you. But if your hearing device is not inserted correctly, it can lead to discomfort, feedback or even decreased hearing ability.
In this article, we'll provide step-by-step instructions on how to put in hearing aids and adjust their volume for optimal performance and comfort.
Quick tips for inserting and adjusting hearing aids
Inserting hearing aids for maximum comfort can be tricky, but you can do it easily with a few simple steps.
- Ensure your hands are clean and dry before touching your hearing aid.
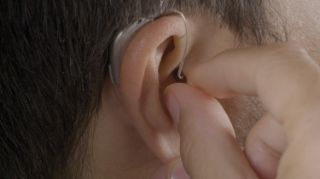
- Gently insert the hearing aid's receiver into your ear canal, ensuring it is snug but not uncomfortable.
- If you're experiencing difficulty inserting your hearing aid, try pulling gently on your ear lobe and push or aim the receiver towards your nose.
- Once the hearing aid is in place, adjust the volume and settings if needed.
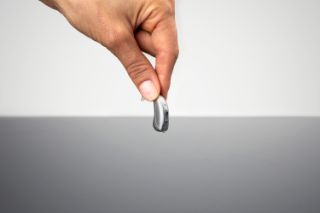
If you're using a Receiver-in-Canal (RIC) or Behind-the-Ear (BTE) hearing aid, you might wonder how they differ. RIC hearing aids have the speaker located in the ear canal, while BTE hearing aids have the speaker located behind the ear with all its other electronic parts.
How to put in Receiver-in-Canal (RIC) Hearing Aids
To place your RIC hearing aids, follow these simple steps:
- Start by placing the hearing aid on top of your ear (similar to how eyeglasses would rest on your ears)
- You want to allow the wire and receiver to dangle over the ear to create some retention.
- Next, you'll take the receiver and gently insert it into the ear canal. Ensure the wire is flat against your face and you're all set!


If you have opted for a custom earmold, the receiver is embedded in the ear mold. You’ll want to ensure the ear mold is correctly seated in your ear canal.
- To seat the custom earmold correctly, gently insert it into your ear canal and use your finger to press it into place.
- Once the earmold is seated correctly, slide the hearing aid over the top of your ear and make sure the wire is flat against your face.
How to put in Behind-the-Ear (BTE) Hearing Aids
A BTE hearing aid is similar in style to a RIC, but instead of a wire, you have a thin plastic tube. The insertion process is the same but avoid kinking the tube when placing the dome or earmold into your ear.
To remove a BTE hearing aid:
- Remove the top of the hearing aid from behind your ear with your index finger and thumb.
- Give a gentle pull to remove the dome or ear mold from your ear canal.
- If your hearing aid uses batteries, once you have removed the hearing aid, open the battery door to save your battery life or for rechargeable hearing aids, put your hearing aids in their charger.
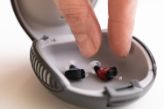
It's important to periodically remove the dome of your hearing aid and clean or replace the wax filter underneath to prevent the accumulation of earwax that can impair sound transmission.
You can remove the dome manually, but a hearing aid dome removal tool can be helpful if you're having difficulty.
A hearing aid dome removal tool is a specialized device that looks like a large pair of tweezers. It allows you to easily and safely remove domes from hearing aids without causing any damage. These tools should only be used on your hearing aid, never on your ears!

How to put in In-the-Ear (ITE) Hearing Aids
ITE hearing aids are custom-made to fit in the contours your ear and ear canal. The process of placing and removing them may vary slightly depending on your brand and model.
- Hold the hearing aid between your thumb and index finger with the larger portion of the aid closest to your hand.
- Insert the long, narrow portion of the hearing aid into your ear canal, rotating it slightly if necessary following the natural shape of your ear.
To remove an ITE hearing aid, gently put your index finger behind the portion of the hearing aid in the bowl of your outer ear. Pinch the aid between your fingers and slowly pull the aid out of your ear canal. Rocking the aid forward towards your face can make this more comfortable.
Your custom hearing aid should have notches or a small removal line to make removing the hearing aid easier. Ask your hearing care provider to demonstrate how these can assist you.

Hearing aid adjustment
It's important to remember that every hearing aid is unique and that each person's experience with them can differ. You may have difficulty getting used to wearing your hearing aid at first, but with patience and adjustments, you can achieve optimal comfort.
Working closely with a hearing care provider is essential to ensure your hearing aid is tailored to your specific needs and preferences.
Need a hearing aid adjustment? Check out these tips or find a clinic for professional guidance.
How to adjust hearing aid volume
Again, if you're having trouble adjusting your hearing aid, don't hesitate to contact your hearing care provider for assistance. They can help you fine-tune your device to ensure you get the most out of it.
Make adjustments to hearing aid fitting
If you're looking to adjust your hearing aid for added comfort, you can try a few things.
Ensure your device is properly fitted to your ear: If it's too loose, it may slip out or cause discomfort. On the other hand, if it's too tight, it could cause irritation or even pain. If you're having difficulties, you can schedule a hearing aid fitting with a local hearing care provider.
Consider the volume level: Some hearing aids have a volume control that you can adjust to find the perfect level for your needs. If you're having trouble hearing, try turning up the volume slightly. Conversely, you may need to turn the volume down if certain sounds are too loud or overwhelming.
Adjust to suit your environment: If you're in a noisy or crowded space, adjust the settings on your hearing aid accordingly. Many devices have different modes for different environments, such as a "restaurant" mode that helps filter out background noise.
Adjusting the earmold
If you're experiencing whistling or buzzing sounds from your hearing aids, it's possible that your earmold or hearing aid ear piece isn't fitting properly.
Adjust the earmold to fit more securely and comfortably to address this issue.
- First, remove the earmold or dome from your ear and inspect it for any signs of damage or wear.
- Be sure that the earmold or dome is clear of wax and other debris. Replace the dome it if it is torn or plugged.
You may also want to experiment with different sizes or styles of domes to find the one that works best for your needs. Your hearing healthcare provider can assist you with choosing an earmold or dome that is comfortable and optimizes your hearing aid function. With a properly fitted earmold, you should enjoy clear, comfortable hearing without any feedback or interference.

Start your journey to better hearing with Amplifon
-
6,000+ National providers
![clinic locations]()
-
Average of 68% off MSRP*
![cash]()
-
60-day risk-free trial**
![hearing aid]()
-
Free follow-up care**
![care]()
Restore the sounds of your life today!
Use our online tool to check your benefits, and connect with a local provider.
We appreciate you reaching out to us.
Our hearing care advocates will call you shortly and help answer all your questions.*Based on 2024 internal pricing analysis. Your savings may vary.
**Care package details vary by plan. Exclusions and limitations may apply. Separate care packages may be available through your provider. These care packages are not included in your Amplifon benefit and may result in additional out-of-pocket cost. Contact Amplifon (888-713-7659) for details.


Good hearing matters